Table of Contents
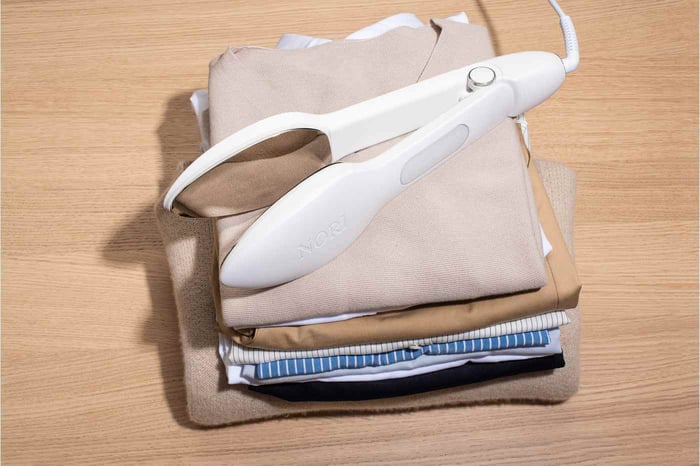
 Most users press 10 or more garments comfortably using a relaxed three-finger grip at elbow height with a neutral wrist. The Nori Press weighs 1.4 lbs — lighter than most traditional steam irons — with weight distributed evenly across two aluminium plates. The ergonomic technique below makes any session length comfortable.
Why the Nori Press Is Comfortable to Use
The Nori Press is a dual iron-steamer: two heated aluminium plates that apply thermal pressure from both sides of a garment simultaneously. Those plates have mass. That mass is what stores and distributes heat evenly across the pressing surface — it is functional weight that does the work.
At 1.4 lbs, the Nori Press is:
Lighter than the average traditional steam iron, which weighs 2.2–3.5 lbs
Comparable to a full-tank handheld steamer (0.8–1.6 lbs depending on tank size)
Lighter than a standard hair dryer (typically 1.5–2.0 lbs)
The perception of heaviness during pressing is almost always a technique issue — specifically: gripping too tightly, holding the garment at the wrong height, or pressing continuously without a break. All three have straightforward fixes.
Not sure if the Nori Press is the right tool for your wardrobe? The honest performance guide breaks down exactly what it does best.
The Ergonomic Technique: Step-by-Step
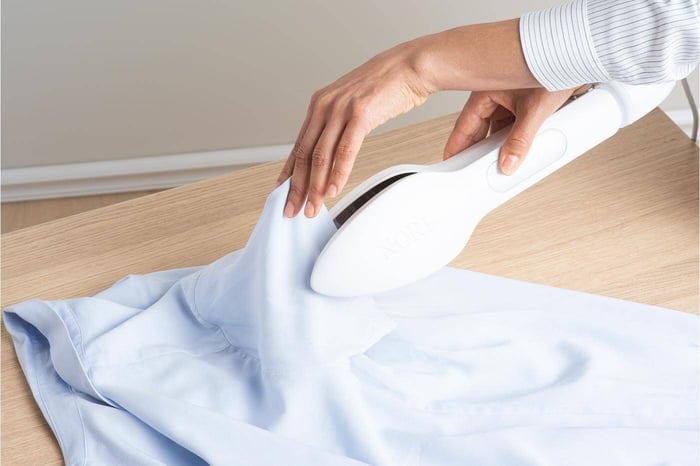
Step 1: Position the garment at elbow height. The most common cause of wrist discomfort is pressing at shoulder height. Lower the garment or hanger to elbow level. Your pressing arm should be at roughly 90 degrees, not extended upward. This single adjustment eliminates most shoulder and upper-arm strain immediately.
Step 2: Use a relaxed three-finger grip. Hold the Nori Press with your index finger, middle finger, and thumb. Do not clench the handle. The device should feel secure but light in your hand. A tight grip creates sustained isometric tension in the forearm that accumulates into fatigue across a pressing session.
Step 3: Keep your wrist neutral. Your wrist should be in line with your forearm — not rotated inward (pronated) or bent downward. A pronated wrist during the clamping motion is the most common ergonomic error. Think of the action as a controlled, even squeeze rather than a rotational twist.
Step 4: Let the weight of the device do the pressing work. The mass of the Nori Press contributes to clamping pressure. You do not need to push down — you need to guide. Close the plates around the fabric and allow them to rest against it. Apply gentle, even resistance as you draw the device slowly along the garment.
Step 5: Press in batches of 3–4 garments; rest between groups. Set the device down after each batch of 3–4 items. A 60-second break between batches is more effective at preventing fatigue than pressing all garments without stopping. It also allows the plates to maintain a consistent temperature, which improves results on later garments.
Hanging vs. Flat Surface: Which Is Easier on the Wrist?
The Nori Press can be used in two primary configurations, each with different ergonomic properties:
Vertical pressing (hanging garment): The garment hangs on a hanger and the Nori Press clamps around it. In this configuration, fabric tension partially counterbalances the device's weight — your wrist is managing the clamping motion, not holding the device against gravity alone. This is the lower-fatigue option for shirts, blouses, and jackets.
Horizontal pressing (flat surface): The garment lies on a bed, table, or firm surface. The surface fully supports the device's weight — zero wrist load during the clamping stroke. This is the most ergonomically comfortable configuration of all, and works well for trousers, skirts, and any thick fabric requiring the multi-pass technique.
Recommendation: use vertical pressing for shirts, blouses, and jackets. Use horizontal pressing for trousers, skirts, and heavy fabrics. Alternating between both positions during a long session distributes the physical demand more evenly and prevents repetitive strain on any single hand position.
Session Pacing for Long-Pressing Sessions
For sessions of 10 or more garments, pacing matters as much as technique. The most effective approach:
Group garments by fabric type. Press silk and delicates first (lowest heat setting, lightest clamping), then medium fabrics, then heavy cotton and denim last.
Take natural breaks at heat-setting changes. When you move from cotton to wool, or from linen to silk, use that 30–60 second pause as a wrist rest.
Alternate between hanging and flat pressing. When your wrist notices the clamping motion, switch to flat pressing on a surface for the next 2–3 garments.
Press cuffs and collar detail last — or first. Detail work on small sections requires more precise grip control. Either do it at the very beginning when your hand is freshest, or save it for the end with careful breaks in between.
Shop the Nori Press — professional results, designed for real life →

FAQs
Is the Nori Press heavier than other travel irons?
No. At 1.4 lbs, the Nori Press is lighter than most traditional steam irons (2.2–3.5 lbs) and comparable to full-tank handheld steamers. The perception of heaviness is almost always technique-related — specifically pressing at shoulder height with a tight grip rather than at elbow height with a relaxed hand.
How do I reduce wrist strain when using the Nori Press?
Three adjustments solve most cases: lower the garment to elbow height (not shoulder height), use a relaxed three-finger grip instead of a clenched fist, and keep the wrist neutral rather than rotated inward. Pressing in batches of 3–4 garments with short rests between groups prevents cumulative fatigue.
Can I use the Nori Press while sitting down?
Yes — horizontal pressing on a flat surface (table, firm bed, ironing mat) is a zero-wrist-strain configuration. The device rests on the surface, its weight is completely supported, and the pressing stroke requires minimal hand strength. Many users who prefer extra hand comfort find flat pressing entirely comfortable.